Overview on how to create a new load in LoadOps
In this article
1. Rate Confirmation Data Extraction
2. Manually Entering the Form Sections
2.1. Customer and Invoice Details
2.1.1. Rate Confirmation
2.1.2. Customer Name
2.1.3. Reference #
2.1.4. Revenue
2.1.5. Factoring
2.1.6. Additional Fields
2.2. Load Details
2.2.1. Equipment Type
2.2.2. Weight
2.2.3. Dispatch Notes
2.2.4. Additional fields
2.3. Pickup and Drop Off
2.3.1. Business Name and Address
2.3.2. Start Date and Time
2.3.3. Handling Time
2.3.4. Notes
2.4. Add Additional Stops on a Load
2.6. Create the load
2.5. Assign a driver
To create a new load, go to Loads ➡️ then click the "Add Load" button located at the top right of the page. This will take you to the Create New Load form.

There are two ways to enter load details into this form:
- Rate confirmation data extraction
- Manually (From scratch or using a load template)
We will highlight each method below.
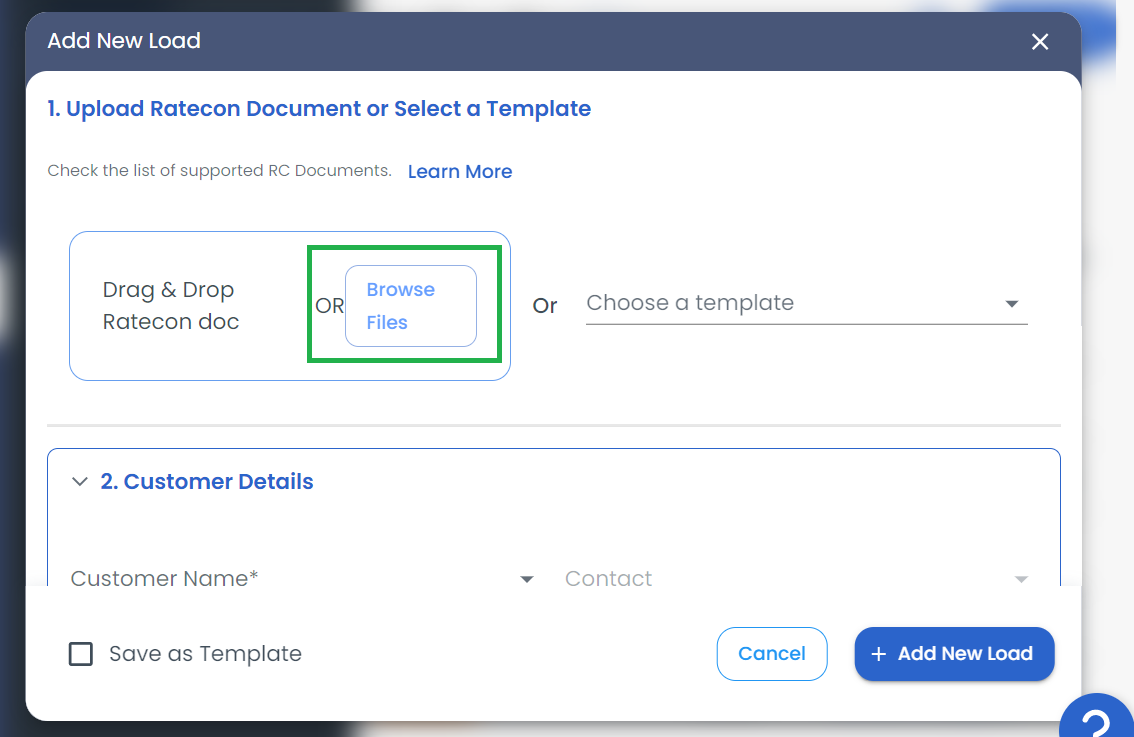
Rate Confirmation Data Extraction
LoadOps can extract the details from a rate confirmation (RC) from your customer (shipper or broker) and fill out this form for you using the data within the RC.
To view our current list of RCs that we support, Click on the option Learn More to view the list of supported RCs.
If you have a supported RC, simply drag and drop the PDF onto this screen and LoadOps will automatically extract all the information from the PDF and fill out this form for you. All you have to do is confirm the details. This saves significant time and clerical errors and is well-loved by our clients. The accuracy of the RC is dependent on the time taken in creating the document so please be patient with documents that have extraneous information and poor formatting.
If you do not see that we support the RC you are trying to extract, please contact our Support Team at LoadOps.Support@optym.com and send them between 5 and 10 different samples of the RC from your customer. We will be happy to create an extraction model for you.
LoadOps only supports original PDFs for data extraction. For example, our data extraction model would not be able to read a scan of a sheet of paper. Reach out to us if you have questions or issues and we will be happy to assist.
Manually Entering the Form Sections
The Create New Load form is divided into these main sections:
- Customer and Invoice Details
- Load Details
- Pickup
- Drop Off
- Add a Stop (optional)
Each section can be expanded to reveal additional fields and options by clicking the downward-facing arrow at the top right of each card.
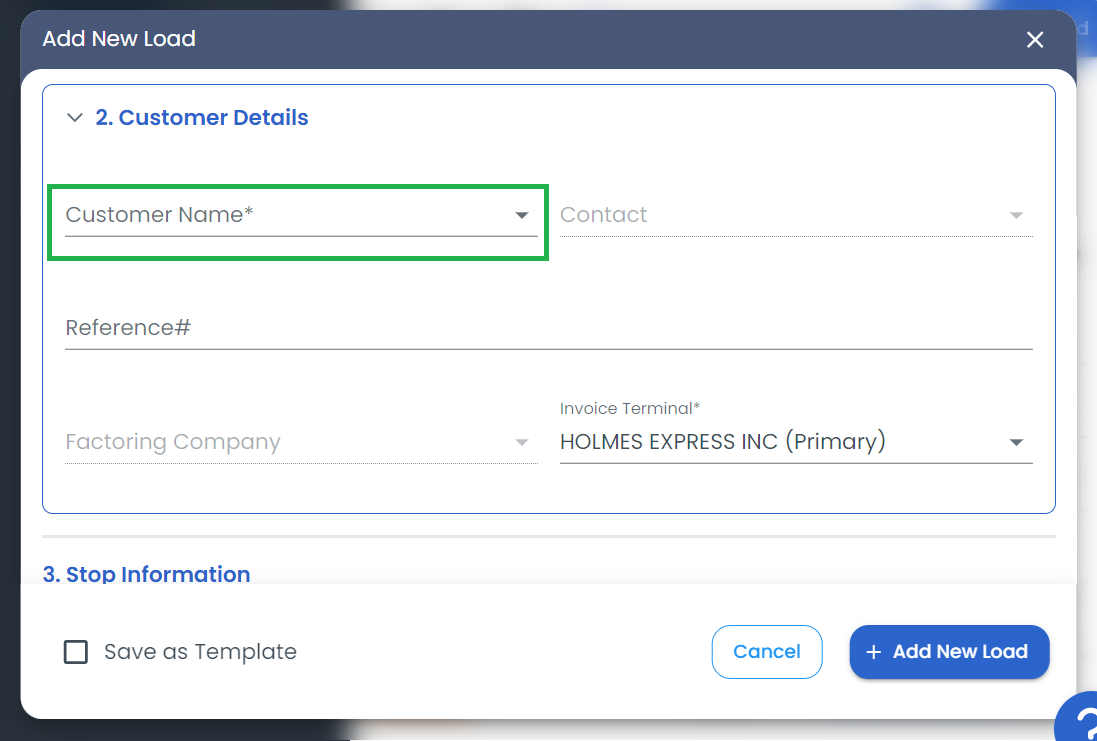
Customer and Invoice Details
Add information like your rate confirmation (which will automatically upload to the documents section), customer name (shipper or broker), reference number, revenue, and if the load is to be factored.
Rate Confirmation
Either upload the file through the “Browse” button or simply drag and drop your file onto this screen. You have the option here to attach the RC to the load or use the data extraction tool to fill the form out for you.
Customer Name
The shipper or broker associated with this load can be selected from your pre-existing customer list within LoadOps. If the customer does not exist in the system, it will automatically create the customer when you hit enter.
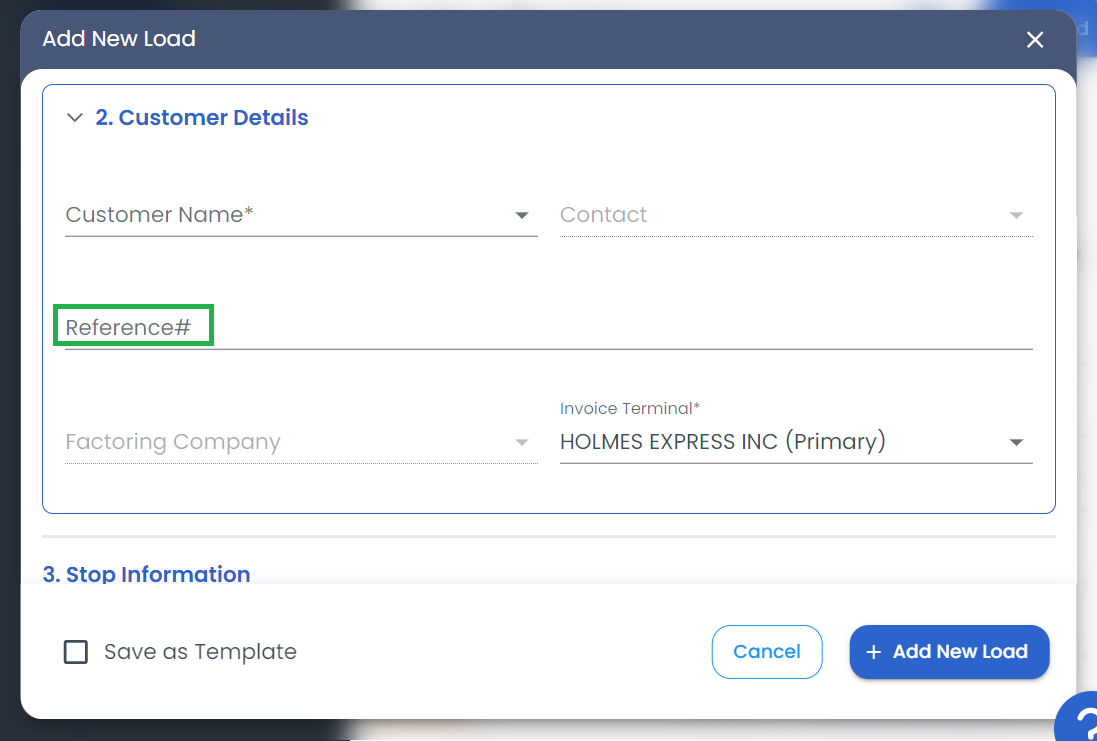
Reference #
This field accepts alphanumeric characters (both letters and numbers). It is a free-form field to use as you wish. Many of our clients add the broker’s load reference number here, as an example.
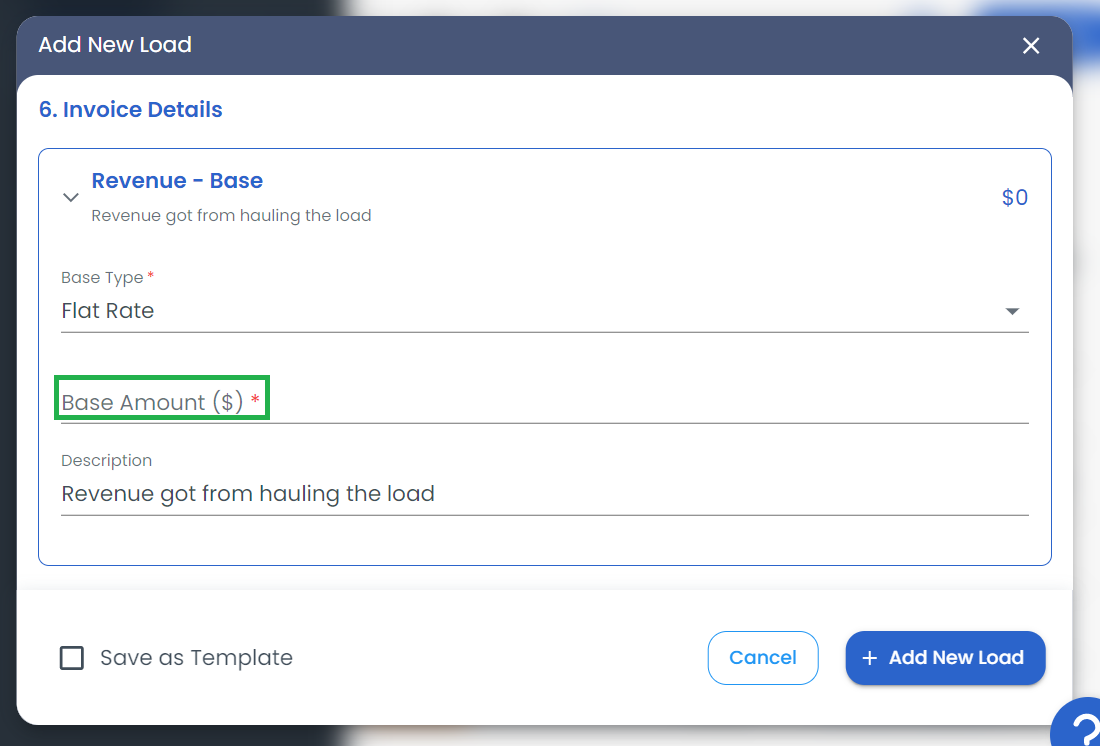
Revenue
This is the line haul revenue of the load. It will be added to the invoice of the load that LoadOps will create for you to send to your customer. You can enter a flat amount or a per loaded mile rate and amount. You may also add any accessorial charges you are aware of before dispatching the load.

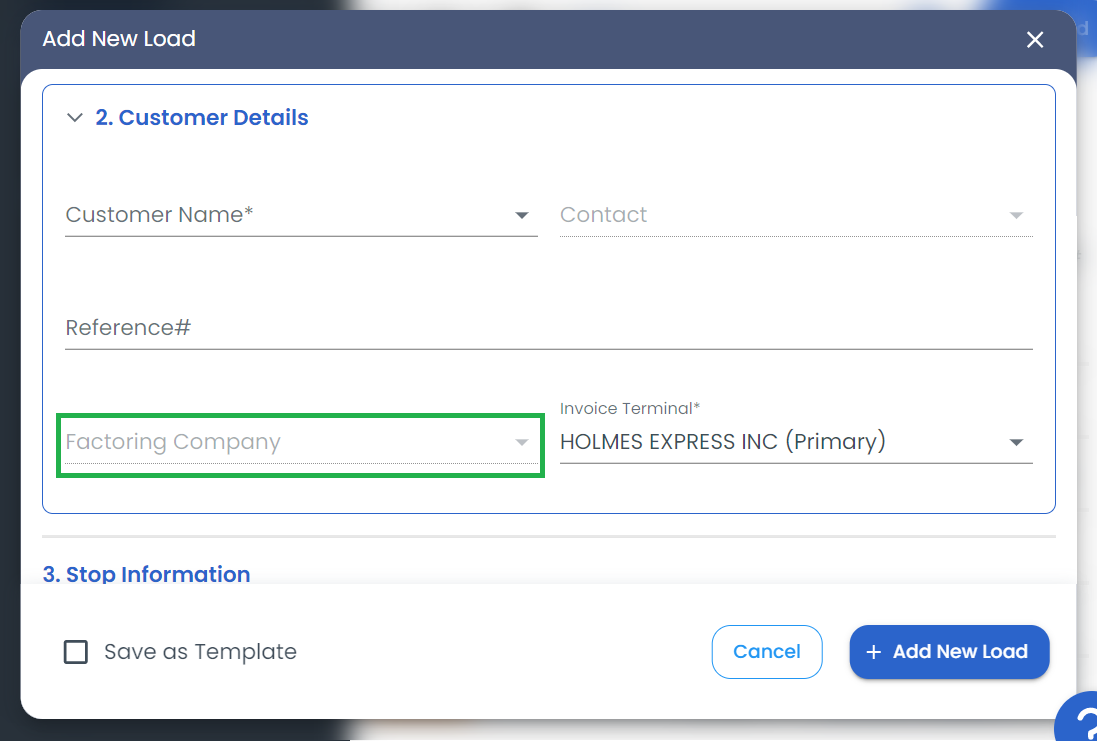
Factoring
If you plan to factor this load, select “Factoring” from the drop-down. Then, confirm the details are correct within the “Factoring Company” and “Contact” fields. Any customer selected that has factoring already set as a default will populate this field automatically.
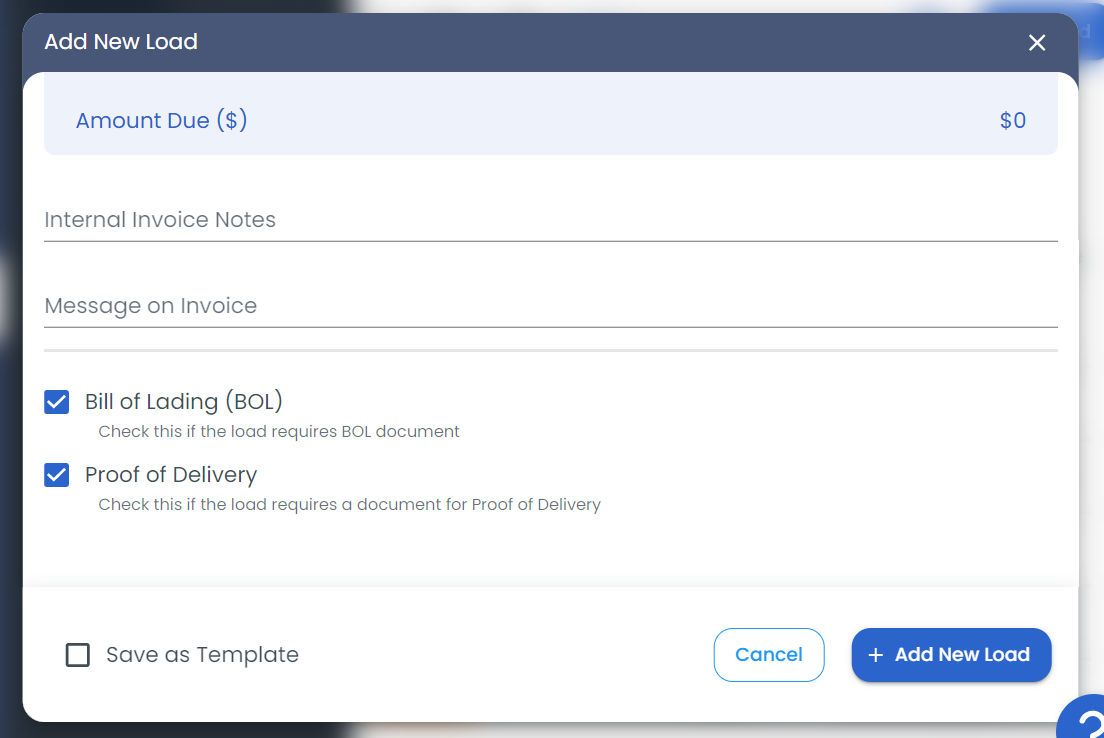
Additional Fields
If scroll down there are some additional options:
- Required Documents
- Select the document(s) required for your driver to upload using his mobile app: Bill of Lading (BOL) or Proof of Delivery (POD). These are set on a system-wide level in Preferences but can be adjusted on a load by load basis
- Invoice Notes
- Internal Invoice Notes added here will be shown to your accounting team in reference to this invoice
- Message on Invoice is shown on the invoice as a memo to the Customer or Factoring company
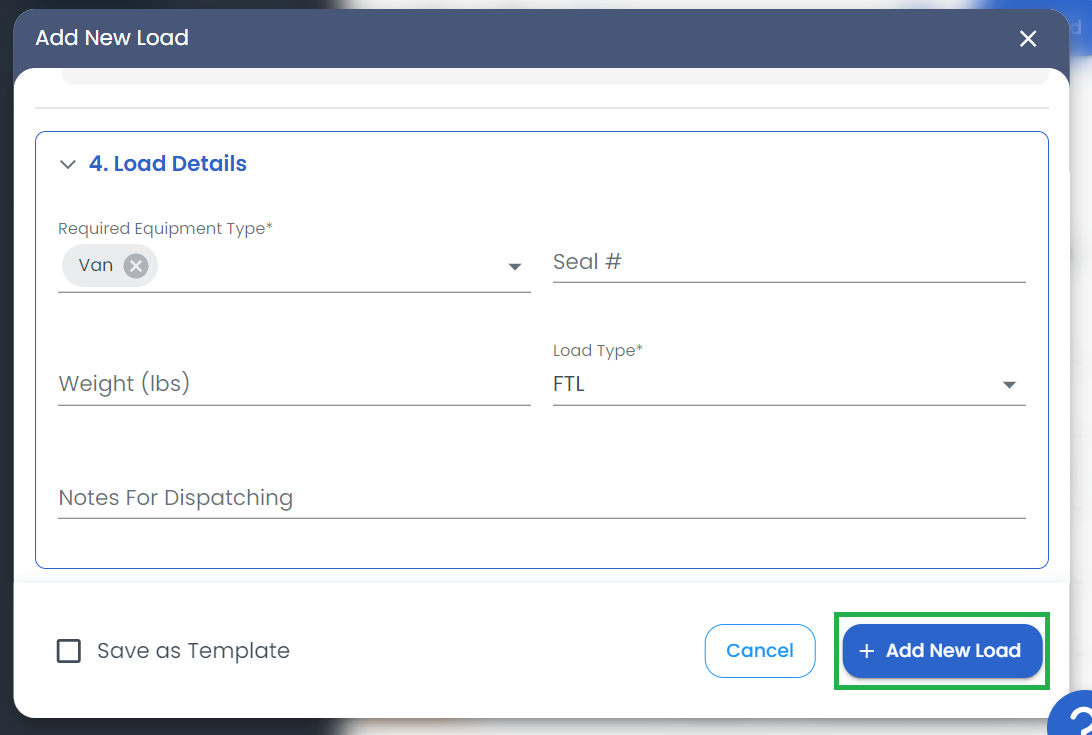
Load Details
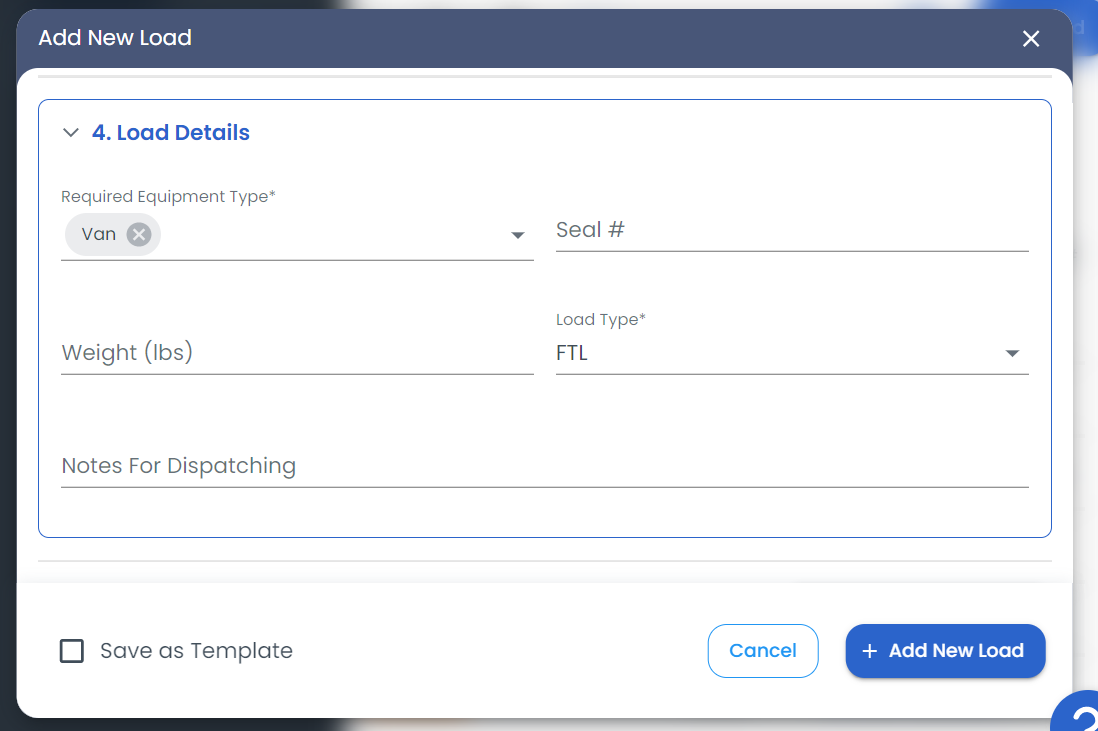
Load details, like the equipment type and shipment weight, can be added within this section. You can also add the details of your commodity or shipment in the Commodity/Shipments section after clicking the downward-facing arrow to the top right of this card.
Equipment Type
Select the equipment type of this load. By default, Flatbed is selected.
Weight
Add the total weight in pounds.
Dispatch Notes
These notes will be shared with the driver through the mobile app.
Additional Fields
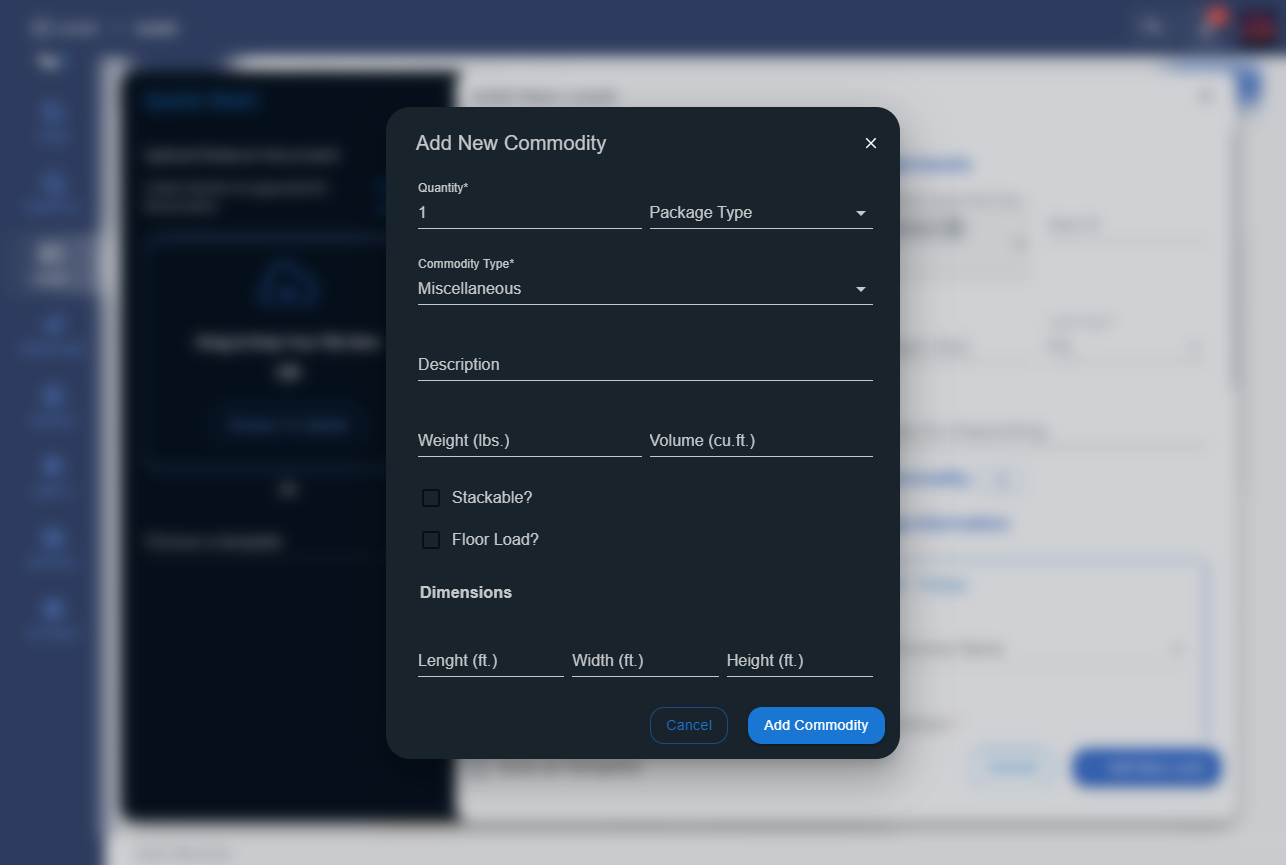
Commodity/Shipments
- To add commodity details, click “Commodity +” and fill in the form by selecting the commodity type, and package type from the drop-down with weight, volume, length, width, and height
Pickup and Drop Off
Here is where you add stop details, such as the business name, address, date, and time. Additional fields can hold stop reference numbers, or contact details of someone a driver should reach out to at a stop.
Business Name and Address
To add stop details, such as the business name and address, either:
- Select a location from the “Business Name” dropdown from the already stored locations in LoadOps
- Enter a new business name within that same field, or
- Search for a specific address in the “Search Location (Address/Zip Code/City)” field
If a new business name is entered in the "Business Name" field, LoadOps will remember this entry and store it as a new location for future use.
If you need to amend an address for the driver, use the “Street Address” field. This will show up on the drive’s mobile app. This is helpful if the address contains a Suite Number, for example.
.
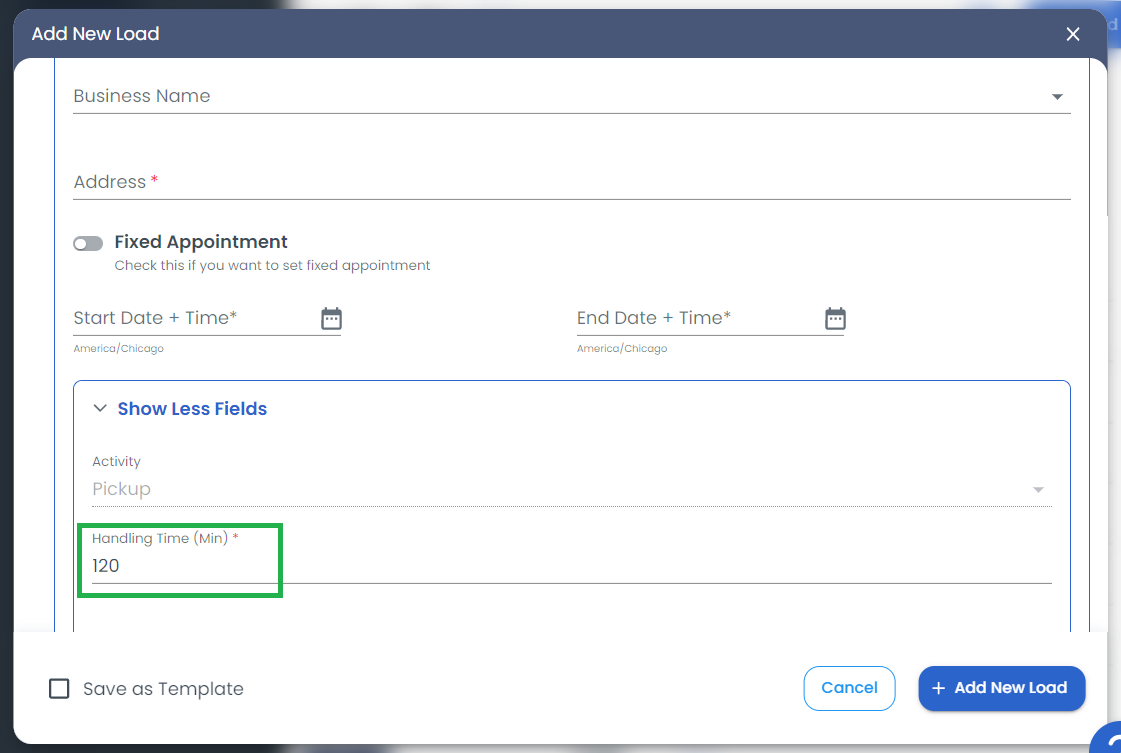
Start Date and Time
By default, the “Fixed Appointment.” checkbox is not selected, which allows you to add details to the “Start Date” and “Start Time” fields to create an appointment window.

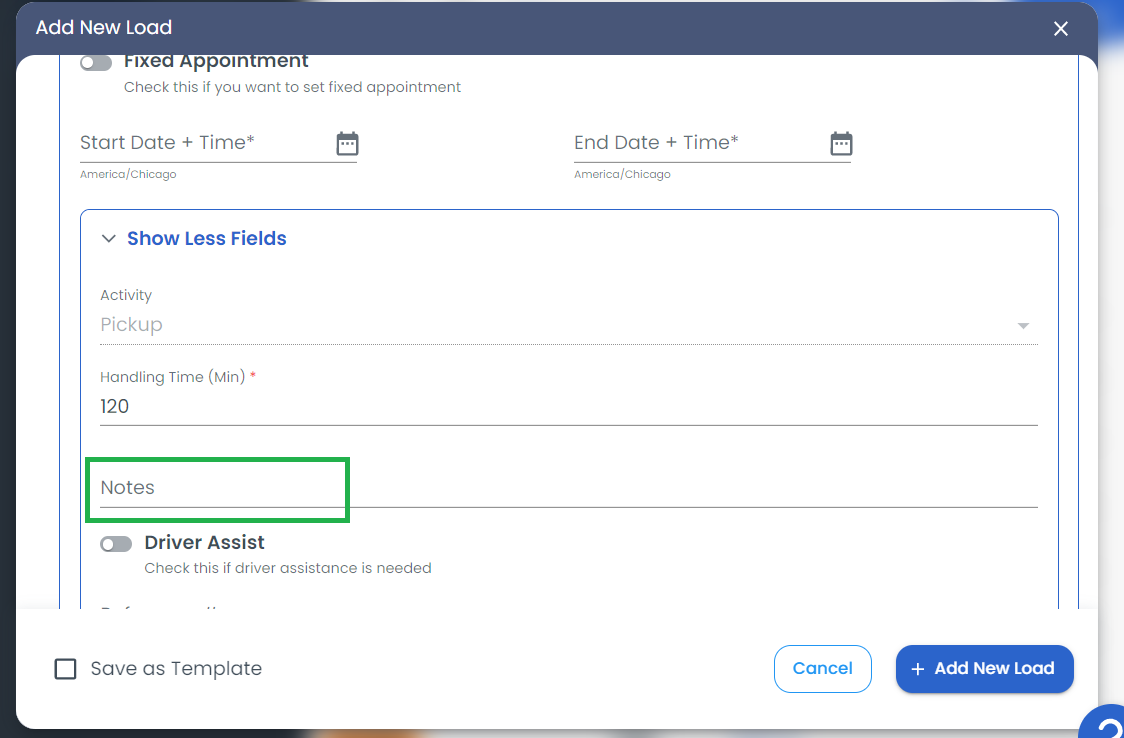
You can click on the option Show More Fields to get the option such as Handling time, Driver Assist, Reference, First Name, Last Name, Email, and Phone number
Handling Time
This is the time the driver is expected to be at the stop. By default, this field is set for 120 Minutes (2 Hours). LoadOps will use this metric to estimate when the driver is expected to leave a stop after he or she arrives as well as when to start calculating detention.
Notes
Any stop instructions for the driver can be entered here. These notes will appear on the driver’s mobile app for each stop.
Driver Assist Required (Yes/No) By default, the selection is disabled. Reference #
First Name, Last Name, Email, and Phone. This is helpful to notify the driver of a specific contact person at a stop.

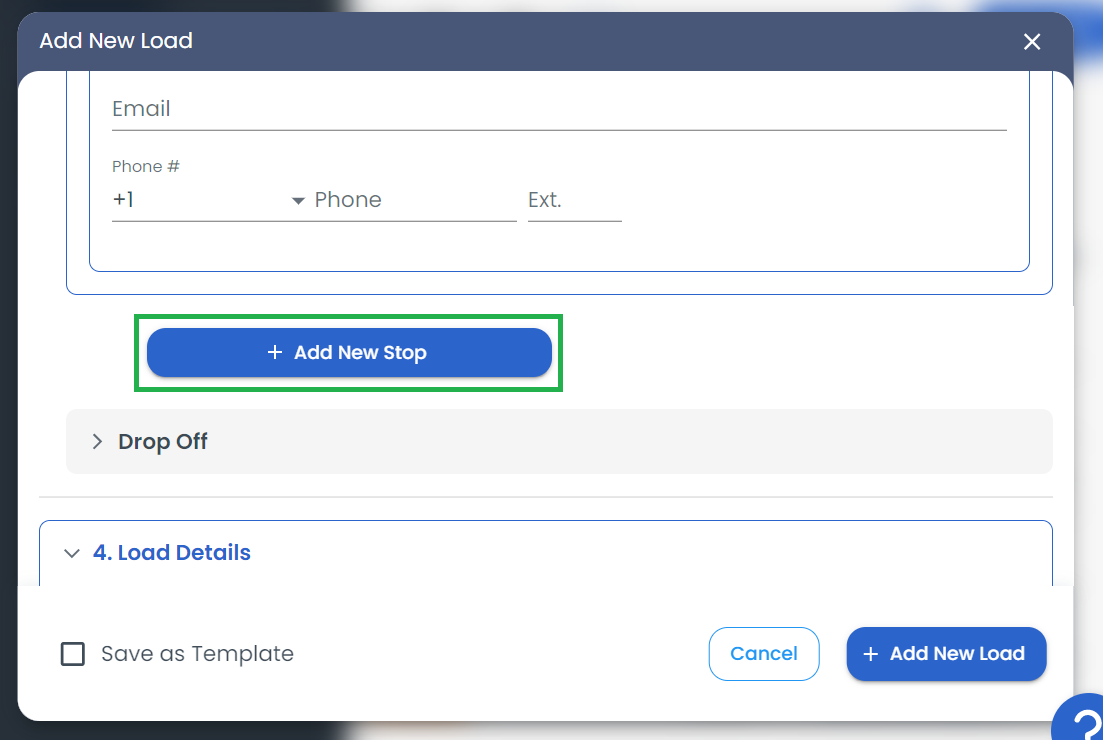
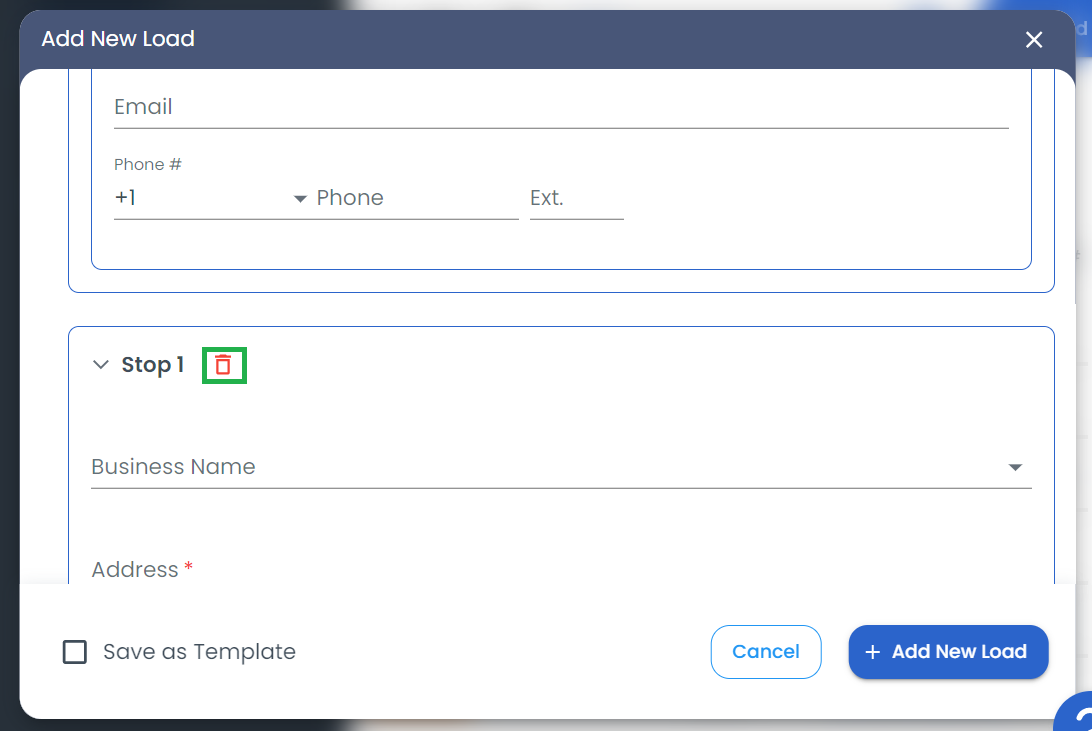
Add Additional Stops on a Load
You can add additional stops on a load by clicking the “Add New Stop +” button below the last Pickup card.
Note: To remove a recently created stop, click the Trash icon at the top right of the stop card.
Create the Load
Once all of the required fields are filled out, the “Add New Load” button is at the bottom right. You would be redirected to the load page.
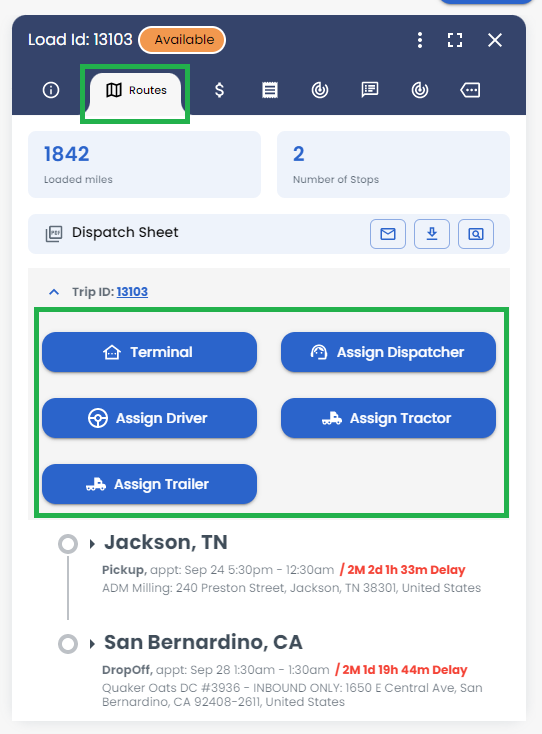
Assign a Driver
Once the load has been created you can visit the second section "Routes". If terminals are enabled for your account, select the terminal this load is associated with.
In Loadops, you can assign an Invoicing Terminal and Dispatching Terminal independently. Note that varying permissions can effect what financial items and loads may be present if these terminals differ.
If terminals are not enabled, click the “Choose a Dispatcher” field to select the Dispatcher from the dropdown.
Also, click the “Choose a Driver” field to select the driver from the dropdown.
Follow a similar process for the tractor and trailer. If the Driver has a tractor and trailer already assigned to them, these fields will populate automatically.
There are two options for driver assignment:
- Assigned: Assigns the load to the driver. Selecting this option will inform the driver of the load. The load will appear within the driver's mobile app.
- Planned: Creates the load for only the dispatcher to see. The load will only show up on the web app and will not appear on the driver’s mobile app. LoadOps will not notify the driver the load has been created. This is helpful if a dispatcher is still working on the details of the load.
Note: It is easy to offer a Planned load to a driver. Go to the Planned Load and click the blue “Offer to Driver” button at the top right of the screen if the driver has the ability to accept and reject loads, otherwise just mark the load as assigned. A load needs to be explicitly Assigned to a driver within LoadOps for it to appear within the driver’s mobile app.